Your roof protects your home from the elements. Damaged or worn-out shingles, insulation and other elements can lead to expensive structural repairs and higher energy bills.
Start by inspecting the areas around chimneys, skylights and vents for leaks. Then, head to the attic and look for water stains or wood staining on the ceiling to locate the source of a leak. Keep reading the article below to learn more about Roof Repair.
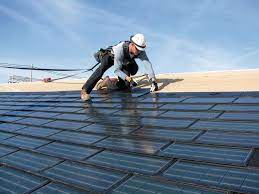
Shingle roofs are a popular choice for homeowners because they are cost-effective and durable. However, they must be inspected regularly to ensure they remain in good condition. Damaged shingles can leak water into your home, causing costly repairs. Fortunately, you can easily repair shingle damage with a little effort.
Missing Shingles
Missing shingles are an obvious sign that your roof needs attention. They may have been blown off by high winds or simply deteriorated over time. A professional will assess your roof for hail damage, as this is the most likely cause of missing shingles.
Cracked or Blistering Shingles
Asphalt shingles are designed to be fire-resistant and heat-resistant, but they can still get damaged by the elements. If a shingle becomes cracked or blistered, it is likely due to extreme weather conditions and should be replaced immediately to prevent further damage.
Dark Spots and Streaks
If you see dark spots or streaks on your roof, it is likely an indication that algae or moss is growing on the surface of the shingles. This is not harmful to your roof, but it can affect the lifespan and aesthetic of the shingles.
Torn or Ripped Shingles
If your shingles are torn or ripped, you can repair them by applying a layer of roof tar to the tear and sticking it to the shingle below it. This will help the shingle stay together and will prevent it from becoming detached from the roof.
To replace a damaged shingle, you will need a hammer, a flat pry bar and a utility knife. A pair of gloves is also recommended to protect your hands from the sharp edges of the roofing nails. Start by removing the existing nail from the shingle with a pry bar. Then remove the nails from the shingle above it, as they will pass through the new one you are about to install.
Line up the new shingle along the location of the damaged one and slide it into place, being careful not to disrupt the adjacent shingles. After you have nailed the shingle in place, apply some roof cement to the edges and corners to prevent water from seeping into your home. You can also caulk around the flashings, vents and chimney to further secure your shingles and prevent leaks.
Damaged Flashing
Flashing is the thin strips of metal installed under shingles or other roofing materials around roof openings such as skylights, chimneys, and vents. Its primary function is to prevent water from entering the house at these points.
When the flashing becomes damaged or corroded, it can leave gaps and allow water to penetrate the roof and interior walls. The presence of moisture can lead to mold and mildew, as well as structural problems.
If you suspect that your flashing is damaged, it is important to contact a professional as soon as possible. Roof repair professionals will inspect the damage and replace or repair the flashing as needed. They will also ensure that the flashing is properly sealed, preventing water from seeping into the home.
Roof flashing is typically made of rust-resistant galvanized metal or aluminum. It is usually adhered to the roof with an adhesive or sealant. It is found at the joints of the roof, as well as at other critical areas where the roof meets the sides of the structure.
A roofing professional will carefully remove the existing flashing without damaging the surrounding shingles or roofing materials. New flashing will be cut to precise measurements and installed with proper sealing. A good quality roofing cement will then be applied to the edges of the new flashing. A good quality roofing membrane may also be applied to the area for additional protection.
After the repair is completed, a roofer will thoroughly inspect the area for any signs of leaks or other damage. The repaired area should be tested during a rainstorm to make sure that the flashing is fully waterproof. A good roofing contractor will always keep detailed records of the work they perform. These records are valuable for future reference, warranty claims, and when selling a property.
Performing regular roof inspections and having a trusted roofing contractor address any concerns promptly can help you save on expensive roof repairs in the future. A professional will catch problems before they can escalate into costly structural damage and health issues. A routine roof maintenance program can also extend the life of your shingles and other roofing materials.
Damaged Gutters
Gutters play an important role in your home. They are designed to route rainwater and melting snow away from your roof, siding and foundation. When gutters are damaged, water is no longer able to drain properly, which can cause a wide range of issues from wood damage in your fascia and soffit to foundation cracking.
Gutter damage is not always easily apparent. Most often, it only becomes obvious once the damage is already done—water stains on your ceilings from trapped moisture, warped wallpaper from mold growth, and rotted fascia boards from leaks that are not addressed quickly. Fortunately, most gutters are fairly easy to repair, especially if you catch them early.
Leaking gutters are one of the most common causes of costly water damage in your home, and they can also be a sign that you have a more serious issue with your foundation or the structure of your house. You can fix leaking gutters by finding the source of the leak. This is usually a cracked section of the gutter or an area where rust has rusted through. The best way to check if a section of gutter is cracked is to use a ladder that reaches comfortably to the gutter height and wear non-slip shoes.
If you find a cracked section of gutter, first remove any loose debris from the affected area. You can then clean the crack by using a wire brush to scrape off any dirt or rust that may be stuck to the surface, then cleaning the area with a rag soaked in mineral spirits. Once the area is cleaned, you can patch the hole with a metal-repair patch that matches your gutters—aluminum patches for aluminum gutters and steel patches for steel gutters. Once the patch is in place, coat it with roof cement.
Loose gutters can happen for a variety of reasons, including excessive weight from debris and clogs, strong winds or heavy snow accumulation, or simply aging and wear and tear. Loose sections of the gutter can pull away from your home or tear off completely, leading to costly structural and foundational damage. To prevent this, check to see that the gutters are attached securely to the home with sleeve-and-spike supports, fascia brackets nailed to the face of the fascia board or wall, or strap hangers nailed to the roof.
Damaged Vents
If your roof vents become damaged by wind, hail, or heavy snow, they can leak during rainstorms. This may cause serious problems, including damage to your ceilings, rafters, and drywall. To prevent leaks from occurring, make sure to repair and replace any damaged vent components promptly.
Water Stains on the Ceiling
Discolored spots on your ceiling, especially those that appear during rainstorms, are a telltale sign of roof vent leaks. These can lead to rot and mold growth, as well as structural damage to your home. It is important to address leaky roof vents promptly to avoid expensive repairs and to protect your home’s health and safety.
Dripping Sounds from the Attic
The unmistakable sound of dripping during rainstorms is another common indicator that roof vents aren’t functioning properly. Often, these issues result from broken vent pipe boots and damaged flashing that allow rainwater to infiltrate your attic and ductwork. Without proper roof ventilation, your attic and other rooms in the house can become damp and mildew-ridden.
Blocked Vents
Clogged roof vents can also lead to serious problems. The first step to take is a visual inspection of the vent itself and the surrounding area to determine what might be causing the issue. If you can access the vent from a ladder, shine a flashlight into the area to check for visible blockages. If the clog is deep, use a plumbing snake to clear it out.
Cracked or Missing Vent Cap
The vent cap helps to keep debris and moisture out of your vent pipe, but it can become cracked or missing over time. If the cap isn’t replaced in a timely manner, it can allow water to enter the vent and infiltrate your home.
Rust Around the Roof Vent Pipe and Vent Collar
If your roof’s metal venting components are exposed to the elements for long periods of time, they can rust and develop holes or cracks. In addition to damaging your roof, rusty metal can also allow water into your attic and ductwork, resulting in serious moisture problems.
Repairing and replacing your vents, as well as repairing any damaged flashing, can help to prevent leaks from forming. Regular maintenance, including routine inspections and regular repairs, can also help to keep your vents working as they should.